


Save That Beef Fat, It is Liquid Gold
-
 Save That Beef Fat, It is Liquid Gold
 -
 Save That Beef Fat, It is Liquid Gold
Smoking a brisket is one of those things that any decent country boy should know how to do.
Kind of like catching a fish and knowing how to gut it, filet it, batter it in cornmeal and seasoning, and fry it in a cast iron skillet over a campfire.
Or carrying a pocket knife and at all times being ready and able to castrate a bull calf.
Or knowing how to clean the ignition points and carburetor on an engine.
Or chewing tobacco, not out of habit, of course, but to cure a bee sting.
Or the skill to pick a tune on a guitar, widdle a sculpture out of wood, or tell embellished tales. Yes, a country boy should be a man of both art and science. Smoking a brisket is both.
I should add, though, that a country boy doesn’t need to be good at any of those things. Quite often, in fact, he is not. The point is to be a man of action. Try. Fail. Try again.
And if you’re a country boy from Fayette County, you should really know how to smoke a brisket, because this is beef Country.
Just trim it, rub some salt and pepper on it, maybe some garlic powder if you’re feeling frisky, cook it for many hours over post oak smoke until the internal temperature reaches a tick or two over 200º, and let it rest for a few hours until you slice into it.
Simple enough, not really. There are lots of variables – whether to wrap it in butcher paper or foil, when to wrap it, what temperature to cook it at, how long to cook it, what kind of barbecue pit to smoke it in, etc.
But I’m not here to tell you how to smoke a brisket. I’m here to tell you to save those fat trimmings. Don’t throw them away or feed them to your dog. You can render them down to create beef tallow – liquid gold. It’s my favorite cooking fat. In my house, we use it in place of other oils for frying and sautéing.
When you buy a brisket, pick one that’s untrimmed. The butcher charges more to trim it for you, and then you miss out on the trimmings. Prime or choice-grade briskets will, of course, be more tender if smoked properly, but they are also more expensive. If you’ve never smoked a brisket before, I wouldn’t start out with a prime or choice brisket. Practice first using a cheaper, select-grade brisket.
Now you need to trim it. Start with a cold brisket. Cold fat and meat is much easier to cut. Wipe off all the excess moisture with paper towels. One side of the brisket is thinner. That’s called the “flat” side. It’s a flat, lean muscle that runs the length of the brisket with a thick cap of fat on one side. The other end is called the “point” side. It has a thicker, more marbled muscle that sits on top of the flat on the other side of the brisket.
I usually start by trimming the fat cap that runs across the flat. Using a sharp boning knife, shave thin slices of fat from the cap. I try to leave about a ¼ inch of fat on the fat cap. A brisket trimmed of all its fat will be dry.
Next, trim the sides of the brisket, cutting away the fat and any thin pieces of meat that will burn when cooking. Make sure to cut away all the hard fat, which will not render when the brisket smokes. Soft fat will render, making the finished product more juicy.
Also, round the corners of the brisket. Sharp corners will burn before the rest of the brisket is finished cooking.
On one side of the point, you’ll notice a seam of hard fat. That’s called the “deckle.” Trim as much of it from the point as you can. Sometimes you’ll end up with a slight hollow spot in the point. That’s OK.
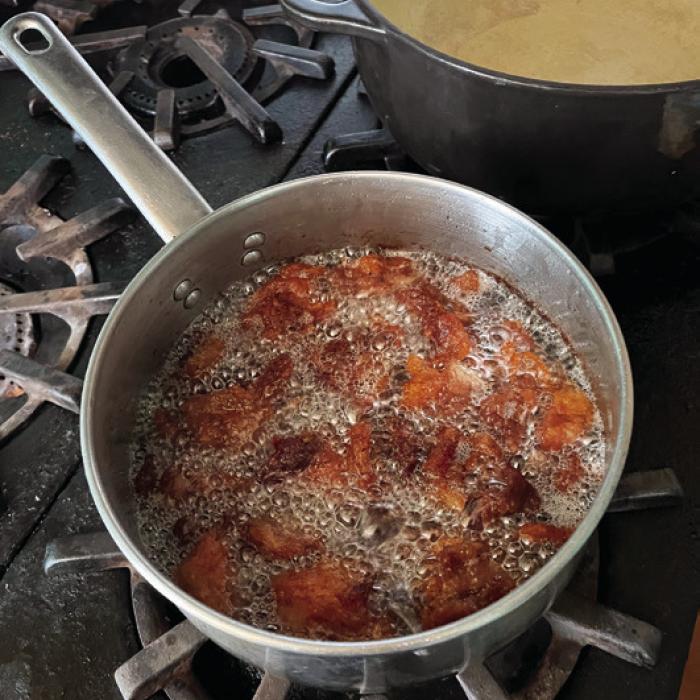
By now, you should have a trimmed brisket and a pile of fat. Cut the pieces of fat into oneinch or smaller pieces. Place them in a pot and sprinkle with a pinch or two of salt. Add a half-inch of water to the pot and place on the stove under low heat, as low as your stove will go. Place a lid on the pot and allow it to come up to a gentle simmer. The simmering water protects the fat at the bottom of the pot from burning. The pieces of fat will slowly render into oil as the water boils. Eventually, the water will boil away and the fat will continue rendering in its own oil.
Do not allow the fat to burn against the bottom or sides of the pot. Stir the pot regularly to keep the fat from burning. After several hours, the pieces of fat will turn into crispy beef cracklings and golden beef tallow. Turn off the heat and allow the pot to slightly cool. The tallow will transform into a white to off-white solid at room temperature and below. Use a wire strainer to strain the cracklings from the tallow before it solidifies. Then strain the warm tallow through some paper towels or cheesecloth to remove the small brown bits of cracklings that remain. This is the same process as making pork lard.
I store beef tallow in a mason jar on the counter. It will stay good for several weeks before going rancid. If you make a lot, you can store it in the refrigerator.
I’ve gotten in the habit of smoking a brisket about once a month. This provides us with an ample supply of beef tallow for our other cooking needs. Lots of folks are moving away from seed oils like canola oil or grapeseed oil over concerns about health and processed foods. I don’t know enough to get into that debate. But I do know that beef tallow tastes so much better than any of the seed oils.
Do you like butter and onion potatoes? So do I, but they taste even better if you use beef tallow instead of butter. Here’s a recipe.
Ingredients
• Four medium gold potatoes, sliced
• One medium onion, sliced thinly • Two tablespoons of beef tallow
• Salt and pepper
• Water (if needed)
• Chopped parsley for garnish
Directions
Heat the beef tallow in a cast iron skillet. Add the potatoes and fry them in the tallow until they begin to show some color. Add the sliced onion along with a pinch or two of salt and pepper. Cover the pan with a lid and turn the heat down to low. Cook for two or three minutes. The onions will sweat and release some water. Stir the pan and check for moisture. If the potatoes begin sticking to the bottom of the pan, add a little water. Recover the pan and cook for a few more minutes.
Check the pan again. Stir and cook under low heat until the potatoes are done, adding a splash of water as needed to keep the potatoes from sticking. Turn off the heat when the potatoes are tender and serve hot. Garnish with some chopped parsley if you like.